
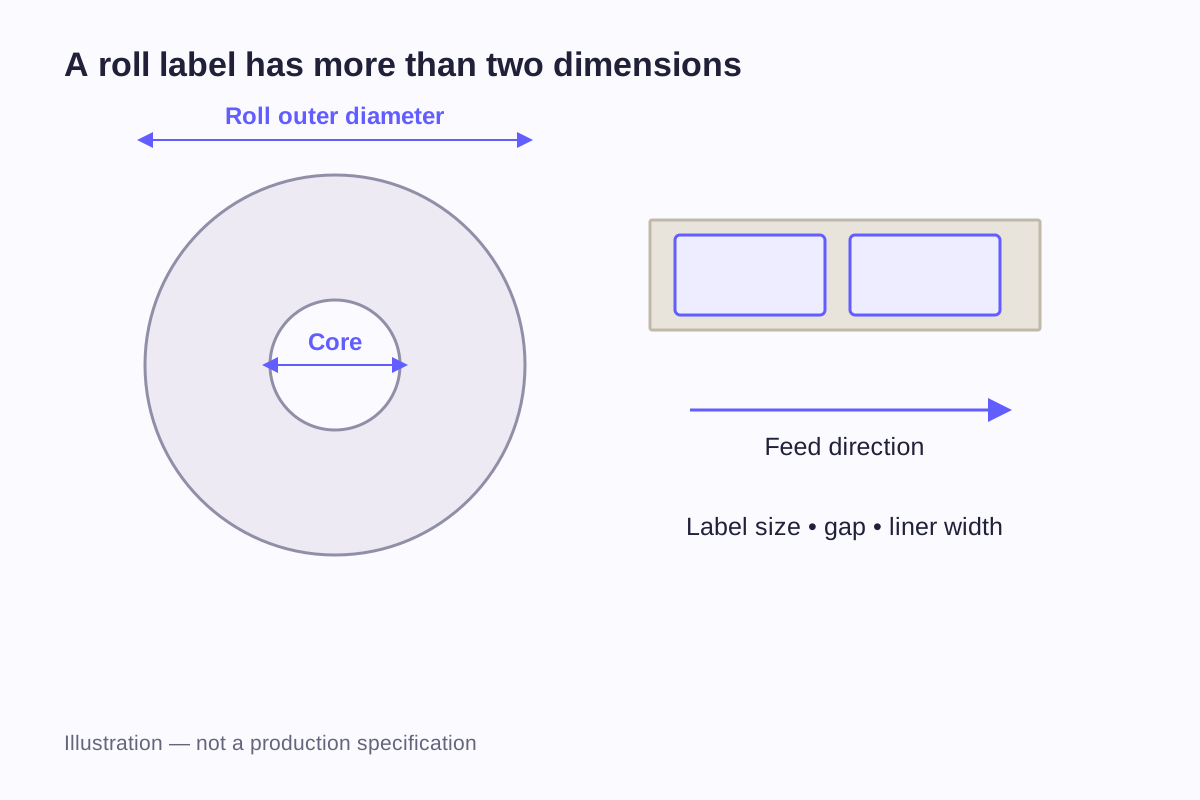
A label can have the right artwork and dimensions but still arrive on a roll that does not fit the equipment. The core may be wrong, the roll may be too large, or the labels may feed with the artwork turned the wrong way. A roll order therefore needs two descriptions: the label you want on the product and the roll that delivers it.
Start with the finished label drawing, then add liner width, gap, core diameter, maximum outside diameter and unwind direction. Finally, state the total label count and how that quantity should be divided into rolls. Keeping those fields separate makes quotations and equipment checks much easier to compare.
Read a roll drawing in two directions
On the finished package, width usually describes the label from left to right as the artwork is read. On a production drawing, a dimension may instead be described across the web or along the feed. Rotating the label on the roll changes that relationship without changing the label that eventually appears on the container.
For example, a 70 × 40 mm printed label could be arranged with its 70 mm edge across the web, or rotated so its 40 mm edge lies across the web. These are different roll layouts. A width and height without a feed arrow do not establish which one is intended.
| Specification | Where to measure or show it | Why it matters |
|---|---|---|
| Finished label size | The cut outline, excluding liner and bleed | Fits the usable area of the product |
| Across-web dimension | Across the liner, perpendicular to feeding | Helps define required web width |
| Feed dimension | Along the direction of movement | Contributes to the repeat length |
| Inter-label gap | Between successive cut outlines | Separates labels along the feed |
| Liner or carrier width | Full backing width, edge to edge | Must fit the equipment path |
| Core diameter | The specified core opening | Fits the roll holder or mandrel |
| Maximum roll outside diameter | Across the full wound roll | Fits the available loading space |
| Unwind | Printed face in/out and first edge to feed | Positions the artwork for application |
Mark the top of the artwork and the feed arrow on the same drawing. This is more useful than sending a label image in one email and a direction number in another.
Measure the container before specifying the roll
The roll format does not determine the label's dimensions. Those begin with the area available on the bottle, jar, box or other item.
On a box, identify the panel between folds and edges. On a jar, separate the straight wall from the shoulder, base and any raised detail. A capacity such as 250 ml is not a label dimension: containers with that capacity can have different diameters, heights and profiles.
The sticker size guide explains how to record a finished outline. For a wraparound bottle label, there is also a circumferential measurement.
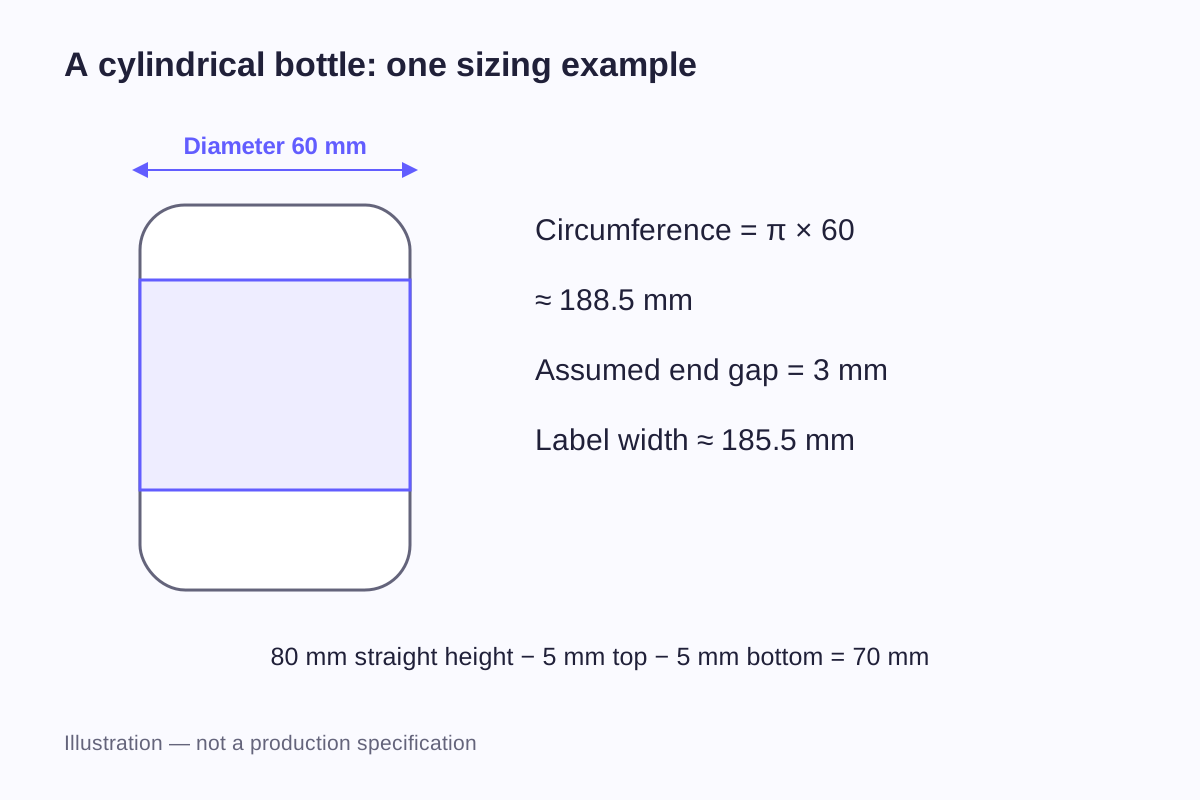
A cylindrical bottle calculation
Suppose a cylindrical bottle has a diameter of 60 mm at the labeling area. Its circumference is:
π × 60 = approximately 188.5 mm
If the design leaves a 3 mm gap between the two label ends, its width around the bottle is:
188.5 − 3 = approximately 185.5 mm
Now suppose the straight labeling area is 80 mm high. Reserving 5 mm above and below leaves:
80 − 5 − 5 = 70 mm
The resulting geometry example is a 185.5 × 70 mm label. The end gap and clearances are design assumptions for this example, not universal allowances or WiseSticker production limits.
This calculation describes a straight cylinder. A bottle that narrows, bulges or changes profile within the label area needs further layout work. A rectangular paper strip that sits comfortably around one height may wrinkle or leave a different gap at another height.
For an early fit check, wrap a paper template around the actual container and mark where its ends meet. Record whether the design calls for a gap, a butt joint or an overlap; they should not be treated as interchangeable. The final printed material can behave differently from paper, so the paper exercise settles the geometry rather than adhesion or production performance.
Core diameter and roll outside diameter are separate limits
The core is the tube at the center of the roll. Its specified opening must suit the equipment that supports it. The outside diameter describes the whole roll after material has been wound around that core.
A roll may fit onto the holder yet be too large for the loading compartment. Conversely, a small roll can still have the wrong core. Neither dimension can be inferred from the finished label size.
When an equipment document says “maximum OD,” retain the word maximum in the order brief. It describes a limit, not necessarily the diameter every delivered roll must reach. Similarly, keep the core measurement separate from the outside diameter of the empty tube; those are not the same measurement.
A published product example
OnlineLabels lists the following specifications for its RL3242 inkjet roll-label product. The metric figures are conversions of its inch values. These dimensions belong to that product; they are not WiseSticker specifications or a match for every applicator. Source: OnlineLabels RL3242 specifications.
| Published field | Inches | Metric conversion |
|---|---|---|
| Label dimensions | 3 × 7 in | 76.2 × 177.8 mm |
| Core diameter | 2 in | 50.8 mm |
| Roll outside diameter | 5 in | 127 mm |
| Gap | 0.125 in | 3.175 mm |
| Carrier width | 3.125 in | 79.375 mm |
The carrier is wider than the 3-inch label dimension. Its width is a separate specification, not an instruction to enlarge the artwork. A similar-looking label from another range could have another core, gap or carrier width.
Keep the manufacturer's machine model and the supplier's material or product code beside the dimensions. “Same as our last roll” is hard to act on if no one can identify which roll or machine was used.
Describe unwind with words and an arrow
Unwind describes the edge that feeds first and whether the printed labels face inward or outward on the roll. Blue Label explains these two choices and recommends using the applicator's requirements to establish the arrangement. Source: Blue Label's unwind guide.
| First artwork edge to feed | What to mark on the drawing |
|---|---|
| Top first | Arrow leaving the top of upright artwork |
| Bottom first | Arrow leaving the bottom of upright artwork |
| Left first | Arrow leaving the left side of upright artwork |
| Right first | Arrow leaving the right side of upright artwork |
Each can be combined with printed-face-in or printed-face-out winding. State both choices. If a supplier uses numbered positions, include its diagram with the number so the reference is unambiguous.
For hand application, the person peeling the label can turn it before placing it. Equipment has a defined feed and application path, so a familiar-looking roll may still present the artwork incorrectly. A sample or marked roll drawing is useful when more than one company handles printing, rewinding and application.
Gap, pitch and labels per roll
The gap is the distance between successive label outlines. Pitch is the repeat distance from one corresponding point to the next, such as the leading edge of one label to the leading edge of the following label.
For a simple example, a label measuring 40 mm along the feed, followed by a 3 mm gap, has a 43 mm pitch. One thousand complete repeats occupy:
1,000 × 43 mm = 43,000 mm = 43 m
This is a repeat-length calculation, not a finished-roll specification. It excludes additional leader or trailer material and does not calculate the wound diameter. Counting only the distance from the first label's leading edge to the last label's trailing edge would omit the final 3 mm gap.
Rotating a rectangular label can change the feed dimension and therefore the pitch. If a 70 × 40 mm label is turned so that 70 mm runs along the feed, the same assumed 3 mm gap gives a 73 mm repeat. A quantity of labels is not enough to determine the length of material without the orientation and gap.
Outside diameter also depends on the core and the wound material structure. A backing liner is present on the roll even though it is removed during application. Comparing only the face-stock thickness misses part of what is being wound. The materials guide explains the layers and how thickness values are reported.
Separate total labels, labels per roll and rolls per pack
A clear quantity schedule might be:
| Quantity field | Illustrative order |
|---|---|
| Total finished labels | 5,000 |
| Target labels per roll | 500 |
| Number of equal rolls | 10 |
| Rolls per shipping pack | 2 |
| Number of those packs | 5 |
A quotation for “10 rolls” is incomplete unless it also states the label count or another agreed measure of quantity.
For multiple designs, list the total for each design as well as the intended roll division. If a front label and a back label are supplied separately, identify them as distinct items. If they are meant to alternate in a particular sequence, show the sequence explicitly and have that arrangement assessed. A roll that contains both designs does not automatically match an application line expecting two independent supplies.
If the target count per roll would exceed the maximum OD, use more rolls with fewer labels on each or agree a different equipment arrangement. Keep the total number of labels unchanged unless the buyer also changes the order quantity.
Match the material to the label sensor
Paper, PET and PVC can be used for different custom roll-label projects. The selected grade and finish need to suit the receiving surface, handling and exposure. The roll specification then needs to work with the equipment that feeds or applies it.
A machine may locate labels using a gap, a mark or another detection arrangement. These details belong in the equipment specification. Zebra, for example, distinguishes gap/notch sensing from black-mark sensing and gives sensor-position requirements for its ZM Series. Those instructions apply to that equipment; use the guidance for your own machine when specifying the labels. Source: Zebra ZM Series sensor guidance.
For transparent or special-effect stock, give the equipment supplier the actual material and liner information. A successful test with an opaque paper label does not establish compatibility with every other construction of the same size. Avoid adding marks to the artwork based on a guess about what a sensor needs.
Appearance remains a separate issue. A clear label may reveal the container and its contents, while an opaque printed face gives the design a different background. The clear-versus-white sticker comparison explains that visual decision. Clear label options can then be discussed alongside the required roll format.
Build one specification that everyone can use
Use the roll-label specification worksheet to bring the product and equipment information together. The most useful attachments are an artwork drawing with dimensions, a feed-direction diagram, the equipment requirements and a photo or drawing of the container.
A compact brief could read: “185.5 × 70 mm wraparound label for the cylindrical area shown; 5,000 labels total. Roll core, maximum OD, liner width and unwind to match the attached applicator specification.” If a measurement is missing, get it from the equipment supplier rather than borrowing a common size from another machine.
The same document should name the material under consideration, the print and finish, and the way the rolls will be packed. It gives the printer, buyer and application team a shared reference while keeping the container measurements distinct from the machine requirements.
Frequently asked questions
Only if the equipment supports that arrangement. A larger opening is not automatically an improvement, and any adapter needs to be appropriate for the holder. Use the core requirement for the actual machine rather than choosing from a supplier's most familiar roll sizes.
They can contain different quantities or use different cores, gaps, orientations and material constructions. The liner is part of the wound thickness. Compare the complete specifications instead of assuming that equal label width and height produce equal rolls.
Include the diagram it refers to. Mark the top of the artwork, the edge that feeds first and whether the printed face is wound in or out. That keeps the requirement understandable when the order passes between a printer, buyer and external applicator.
No. The standard MOQ is 500 pcs, and the quotation must state the counting unit and supplied quantities for the order. List total finished labels and desired labels per roll so there is no confusion between the product count and its packaging.
Capacity alone is insufficient. Measure the labeling area on the actual container, including its profile and usable height. For a wraparound label, record the circumference at that area and whether the ends should have a gap or overlap. Tapered and irregular containers need a layout developed for their shape.
Related guides
- Sticker Materials Explained: Vinyl, PET and Paper
- Clear vs White Stickers: How Backgrounds and White Ink Change the Design
- Sticker Size Guide: Dimensions in Inches and Millimeters
Send the label drawing, equipment requirements and an unwind diagram, along with the total label quantity. Include the container or surface being labeled so the material and roll format can be discussed together.
Discuss Your Roll Labels